Everything you need to write, color and publish your khawater on lametsohab.com. Step by step, with no technical experience needed.
Hi Nevin, this guide is made for you. You will log in, write a new post, color each friend's lines, and publish it. Every screenshot has numbered circles, and each number is explained in the steps next to it.
Your dashboard address is lametsohab.com/wp-admin.
Your username is nevinfarouq. You can also log in with your email.
The dashboard is in English, like the rest of the site. Button names are written exactly as you will see them, in this style: Publish.
How to read the screenshots
A teal circle like 1 marks a spot on the screenshot, and the same number appears in the text that explains it. An orange circle ! marks something to be careful with.
Looking for something?
Press Ctrl + K (or ⌘ + K on a Mac) to search every page of this guide.
Open your dashboard from any browser. It takes under a minute.
Sign in
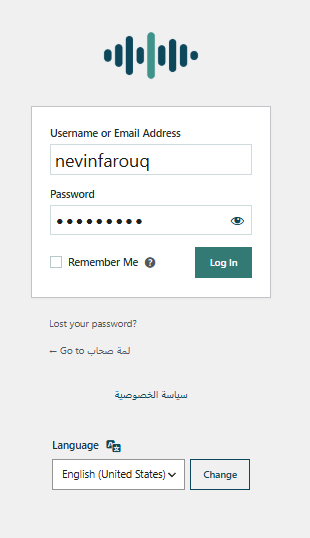
Open your browser, type lametsohab.com/wp-admin and press Enter.
In Username or Email Address, type your username nevinfarouq or your email.
Type your password. The eye icon next to the box shows what you typed, so you can check it.
Tick Remember Me if this is your personal device. The site will remember you, so you won't have to log in every time.
Click the green Log In button.
The login page.
Forgot your password?
It happens to everyone
Click Lost your password? under the boxes and type your email. You will get a link to choose a new password.
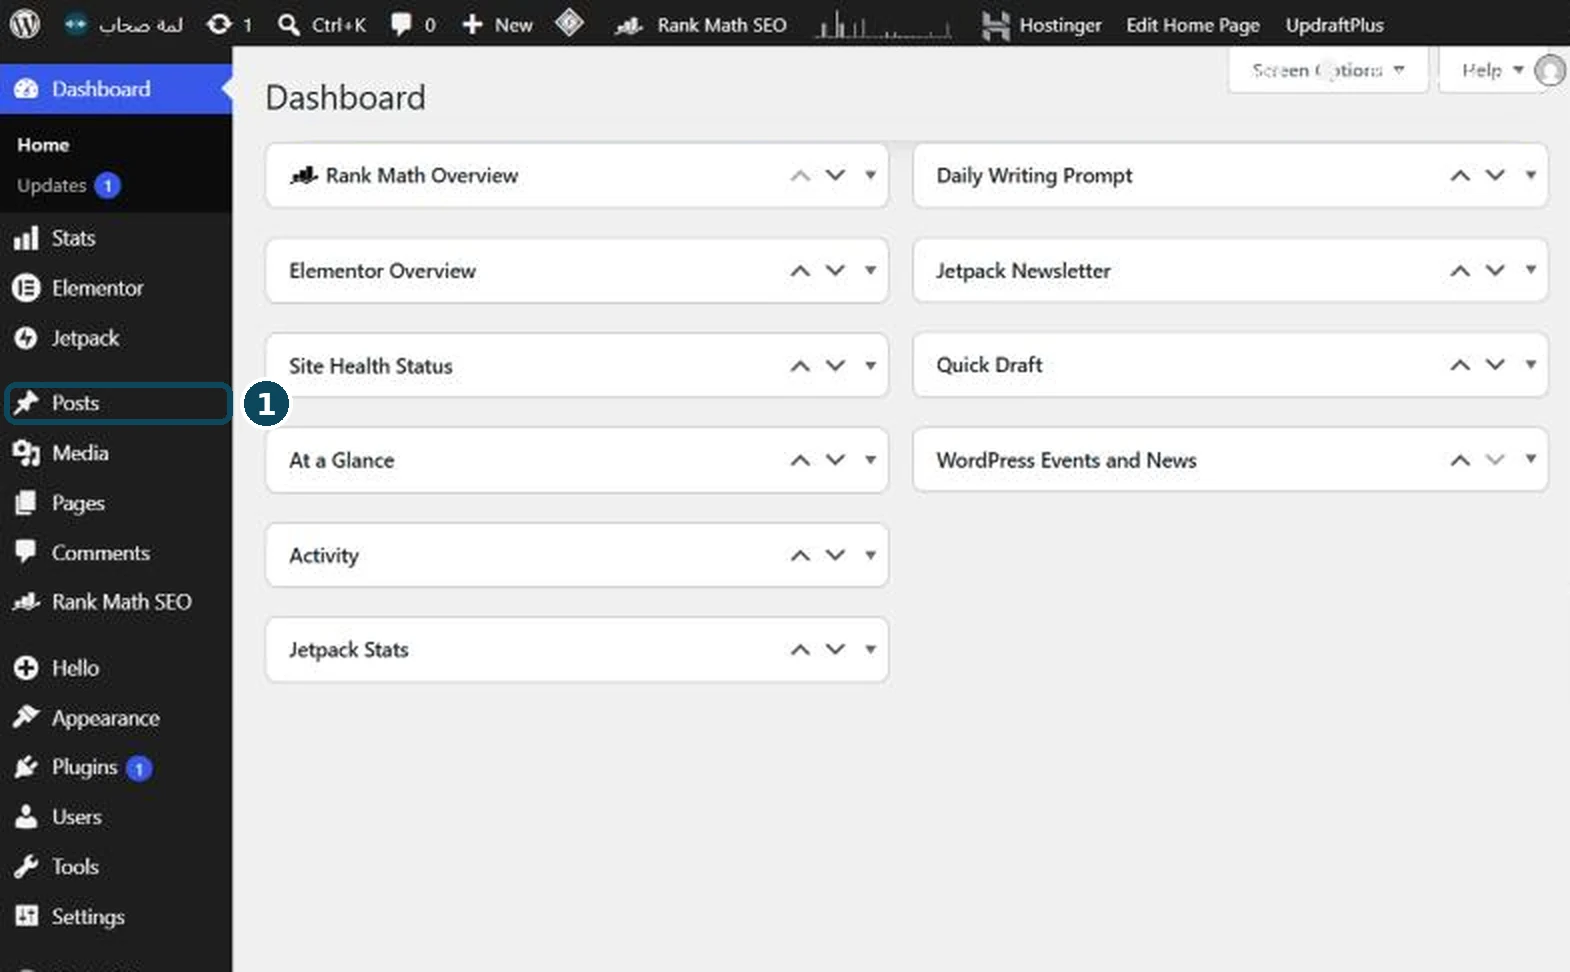
The first screen you see after logging in is the Dashboard. Here is what each part is for.
The main menu
The dark menu on the left holds every section of the site. The dashboard is in English, like the rest of the site, so we write the buttons exactly as you will see them.
1Posts is the home of your khawater. Most of your work starts here.
Switch the dashboard to Arabic
If you prefer, you can show the whole dashboard in Arabic. This setting belongs to your account only. It does not change the language of the site your readers see.
Move your mouse over your name at the top right of the screen (Howdy, …) and click Edit Profile. You can also open Users → Profile from the menu.
Scroll to the Language box and choose العربية.
Scroll to the bottom of the page and click Update Profile. The dashboard switches to Arabic right away.
Switch back any time
Follow the same steps and choose English (United States). If العربية is not in the list, tell us and we will add it.
Button names in this guide
The guide writes every button in English, as the dashboard shows them now. After you switch to Arabic, the buttons will appear in Arabic, so use the screenshots and the search box to find your way. The Speaker Colors page will also appear in Arabic.
Sections you will use
Posts: the khawater themselves, plus Categories and Tags.
Media: every image uploaded to the site.
Comments: readers' comments. You can approve or delete them.
Appearance → Speaker Colors: the dialogue colors. See Speaker colors.
Sections to leave alone
Please don't change these
Plugins, Elementor, Settings, LiteSpeed Cache and Hostinger keep the site running. If you need something in them, ask us and we will do it.
Every khatera you have written, published or not, lives in one list.
Open the list
From the menu, click Posts → All Posts. You will see published posts, drafts, and anything in the trash.
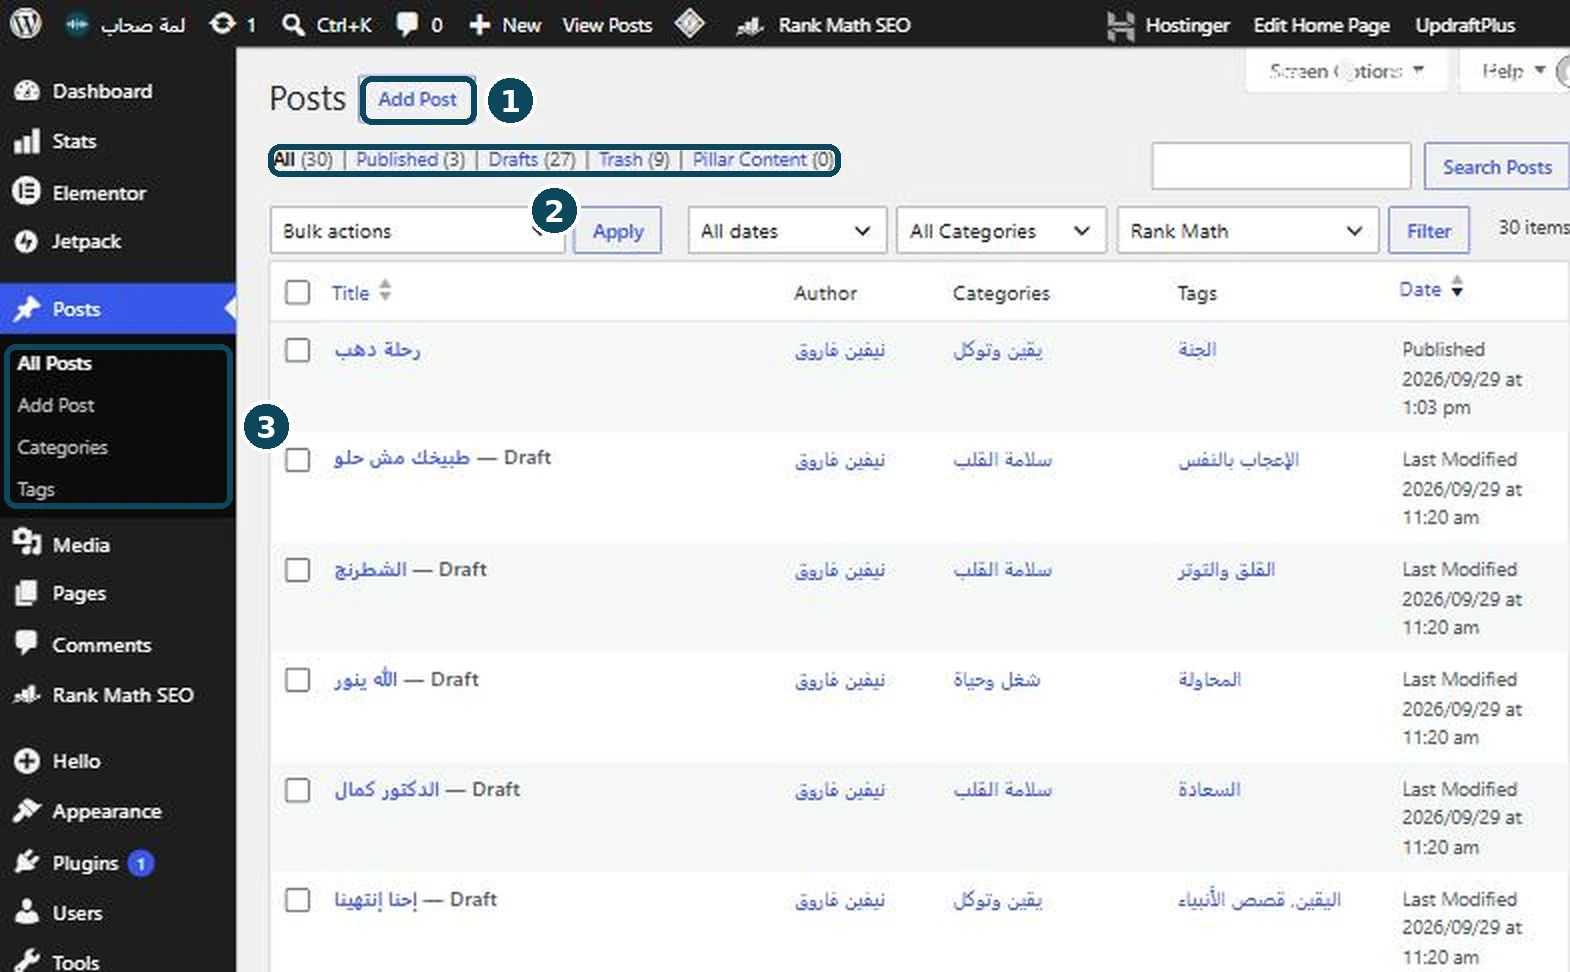
The posts list.
1Add Post opens a new, empty post.
2 These filters sort posts by status: All, Published, Drafts (not published yet) and Trash.
3 The Posts submenu: All Posts, Add Post, Categories and Tags.
Actions on each post
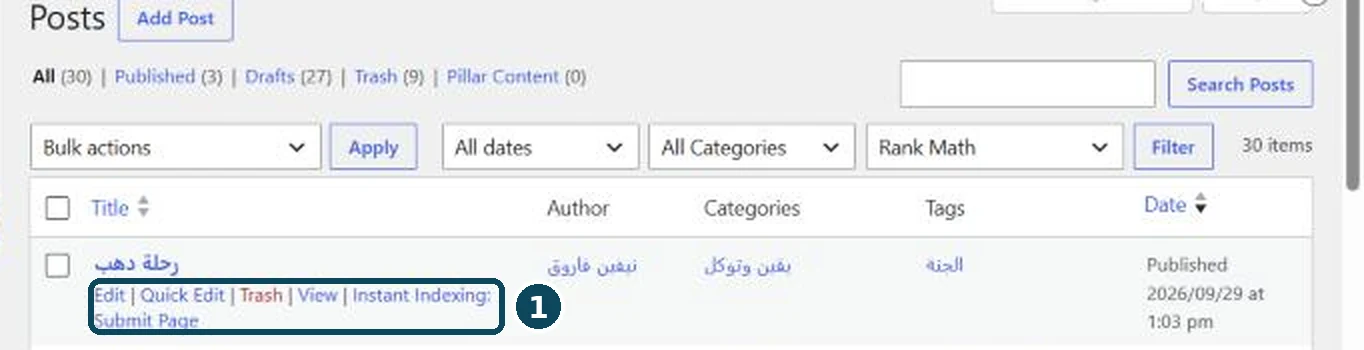
Move your mouse over a post's title and a small row of links appears underneath.
1 The links under the title.
Edit: open the post and change it.
Quick Edit: change the title, category, tags and status without opening the post.
Trash: move the post to the trash. It is not deleted for good. Open the Trash filter and click Restore to bring it back.
View or Preview: see the post as a reader will.
Find a post
Search
The search box at the top right of the list looks through titles and text. Type any word from the khatera and click Search Posts.
The editor splits a post into blocks. Each paragraph is its own block, which is what lets you color every line of dialogue.
Open a new post
Click Posts → Add Post.
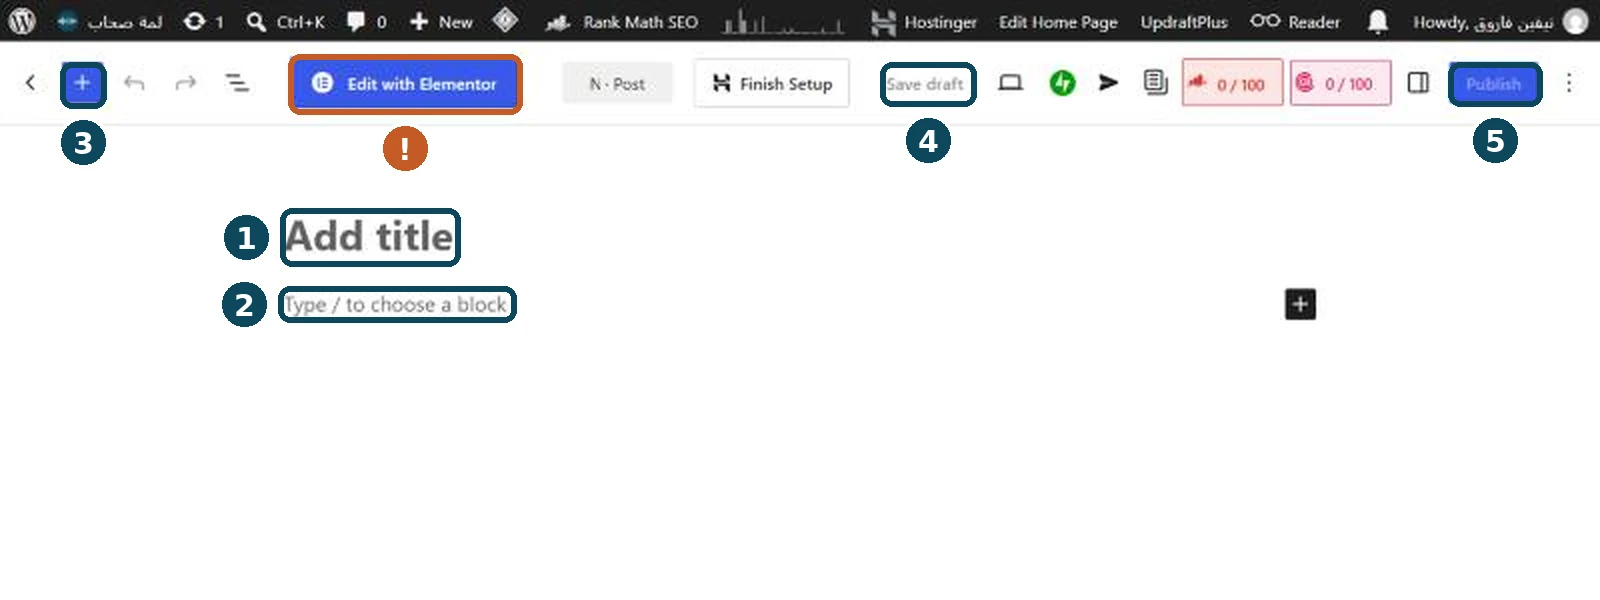
The new post editor.
1 Type the title in Add title.
2 Click here and start writing. Each time you press Enter, a new block (paragraph) begins. Write each line of dialogue in its own paragraph.
3 The blue + opens the block menu, for adding a heading, a quote or a list.
4Save draft saves the post without publishing it. Save often while you write.
Write posts in this standard editor only. The Elementor button is for designing the site's pages. On a post it can break the formatting and colors.
The block menu
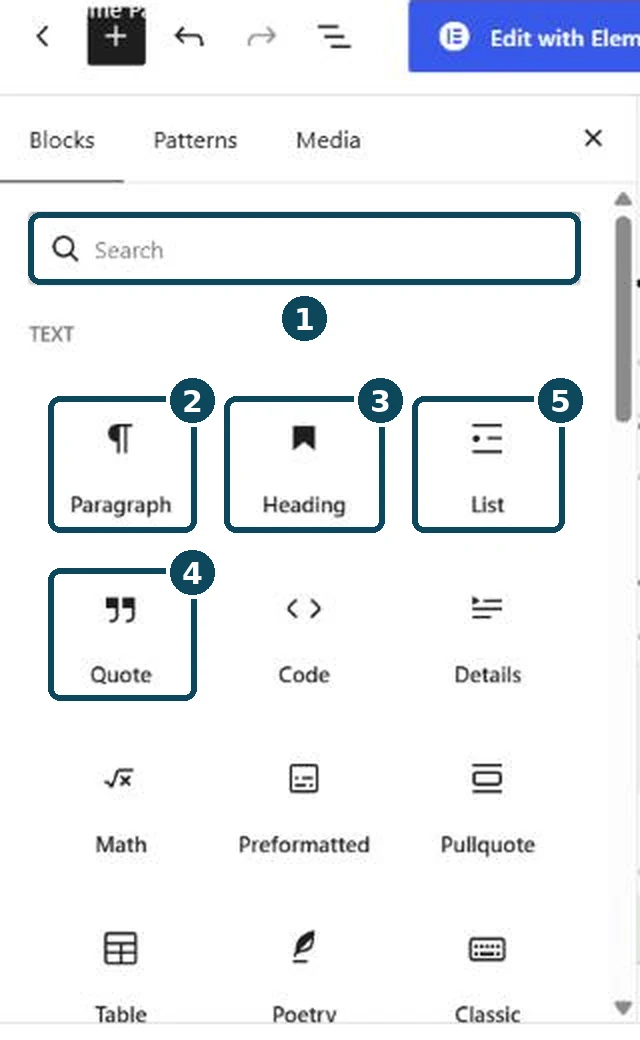
The block menu after clicking +.
1 The search box. Type a block's name instead of hunting for it.
2Paragraph: a normal paragraph. You will use this for all dialogue and narration.
3Heading: a heading inside the post.
4Quote: a quotation. We use it for verses and hadith.
5List: bullets or numbers.
A faster way
In an empty block, type / and then the block's name, for example /quote, and press Enter.
Every friend in the group has a fixed background color, so readers know who is speaking without her name being written.
How it looks on the site
The color is applied to a paragraph with a class, a short English name that you paste into the Additional CSS class(es) box.
دخلت صاحبتنا رانيا علينا ووشها متغير، وحسّينا إن عندها مشكلة.
مالك يا رانيا؟ إيه اللي حصلك من امبارح؟ كنتي كويسة بالليل؟!!!
الغاز ما اشتغلش النهاردة، ومعرفتش أشرب القهوة والشاي بلبن بتوعي.
إحنا افتكرنا عندك مصيبة، وقّعتي قلبنا! كل الحزن ده عشان القهوة والشاي بلبن؟ طيب ما تشربيهم معانا.
Line 1 is plain narration with no color. Line 2 is "From the group" (gray), line 3 is Rania, and line 4 is Noha.
Color a line
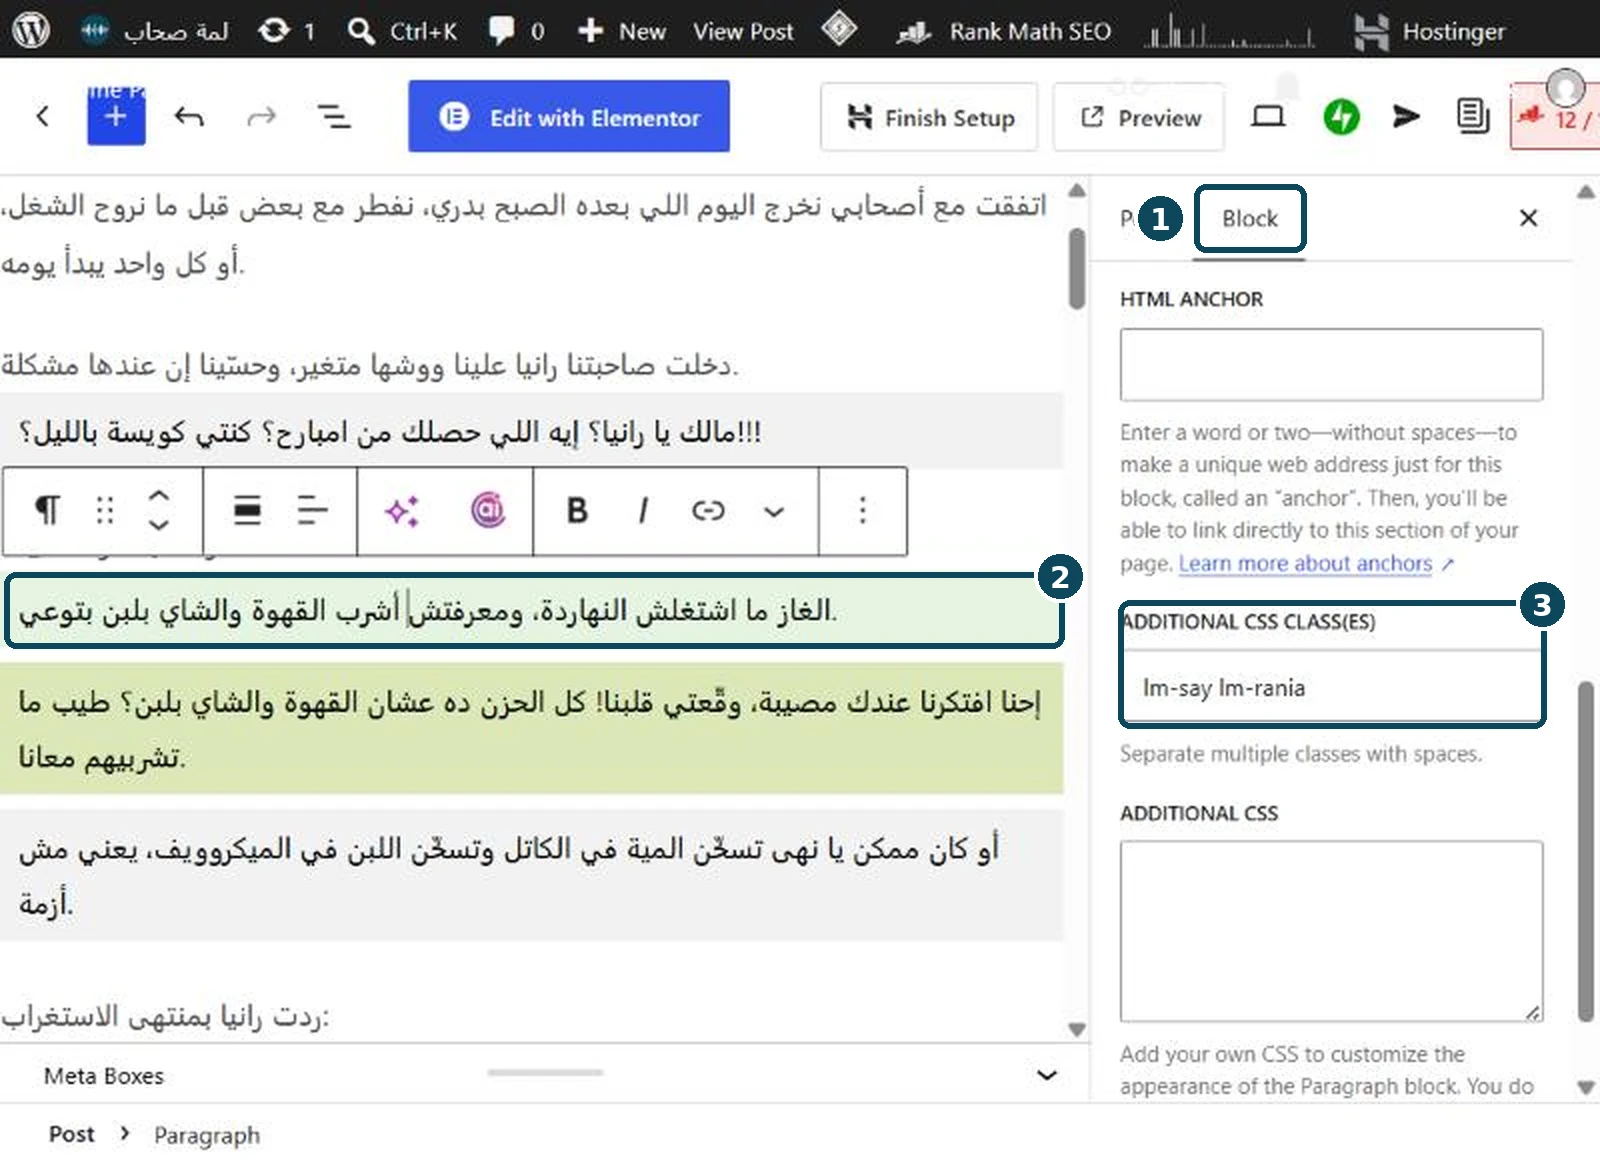
A paragraph for Rania is selected, and her class is in the side panel.
Write the line of dialogue in its own paragraph.
2 Click the paragraph once to select it.
If the side panel is hidden, click the square icon at the top right, next to the Publish button.
1 In the side panel, choose the Block tab.
Scroll to the bottom of the panel and click Advanced to open it.
3 In Additional CSS class(es), paste the character's class, for example lm-say lm-rania
Click anywhere outside the box. The paragraph changes color right away in the editor.
Character classes
Each class has two words with a space between them. lm-say means "a line of dialogue", and the second word is the character. The button next to each class copies it.
This table shows the current colors. If you change a color or add a character on the Speaker Colors page, that page is always the most up to date.
Work faster
Repeat a character's line
After you color the first line for Noha, select it and press Ctrl + Shift + D (⌘ + Shift + D on a Mac). A copy appears below with the same color, ready for her next sentence. A block you copy and paste elsewhere also keeps its color.
Mind the space and the letters
Use exactly one space between lm-say and the character name, and write everything in lowercase English. If more than one block is selected, the Advanced section does not appear, so select a single paragraph.
The result on the site
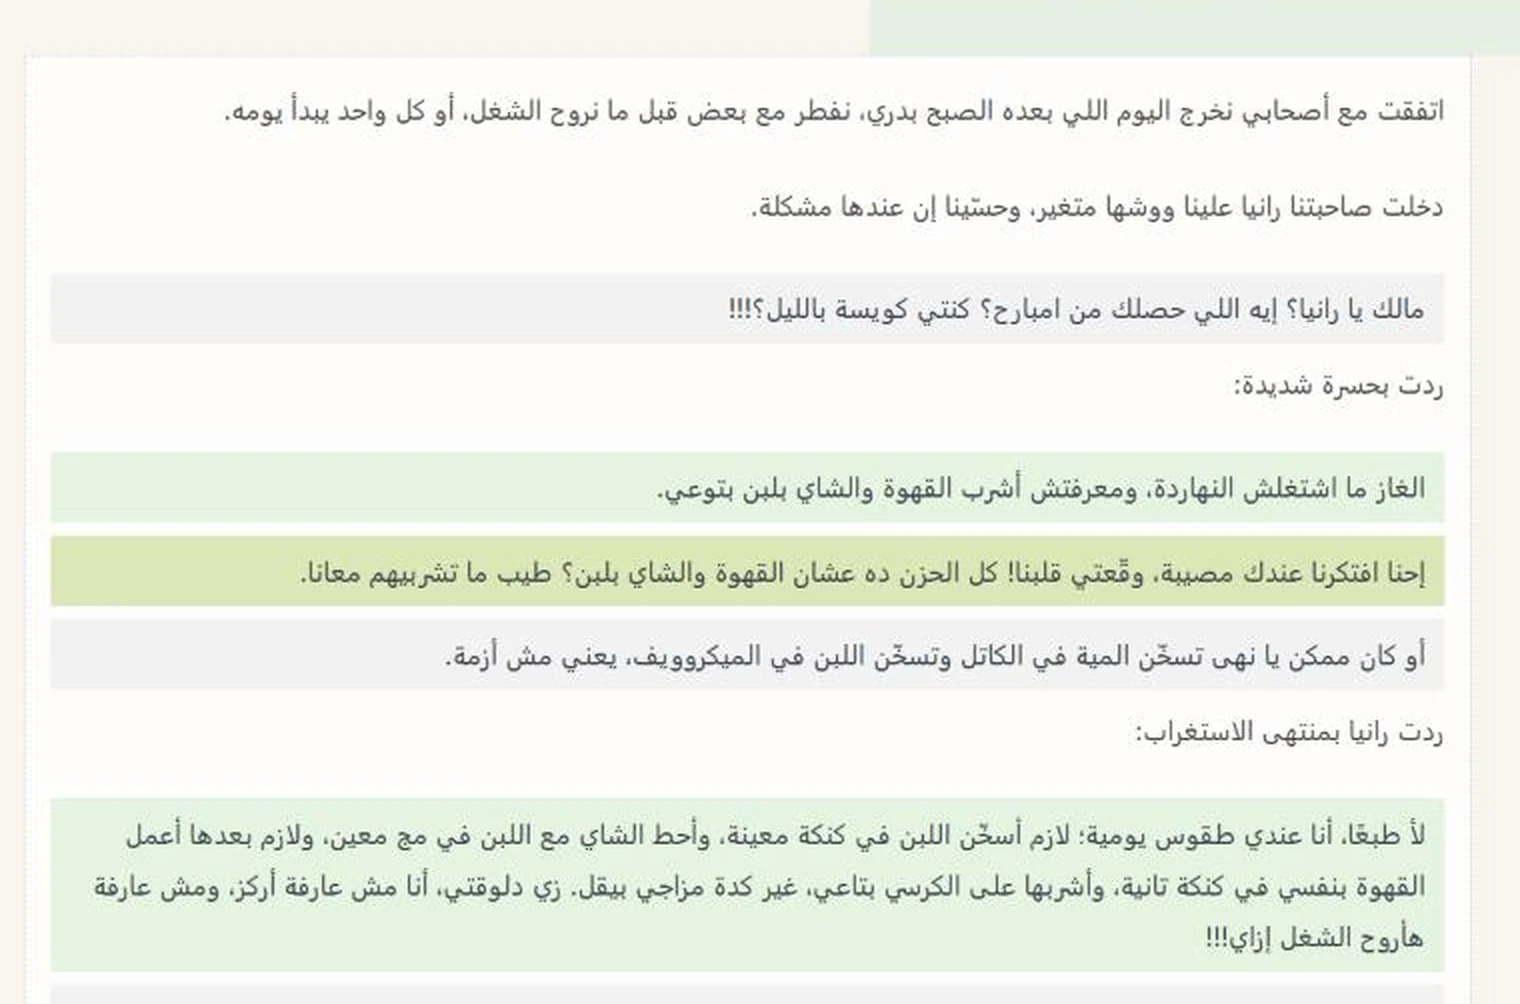
The post "أنا مش عارفة أركز" on the site, with each friend in her own color.
Besides dialogue, a few more classes give a post its look. They all go in the same Additional CSS class(es) box.
A Quran verse
Add a Quote block (type /quote and press Enter).
Type the verse inside the quote. In the small line under it (Add citation), type the surah name and verse number.
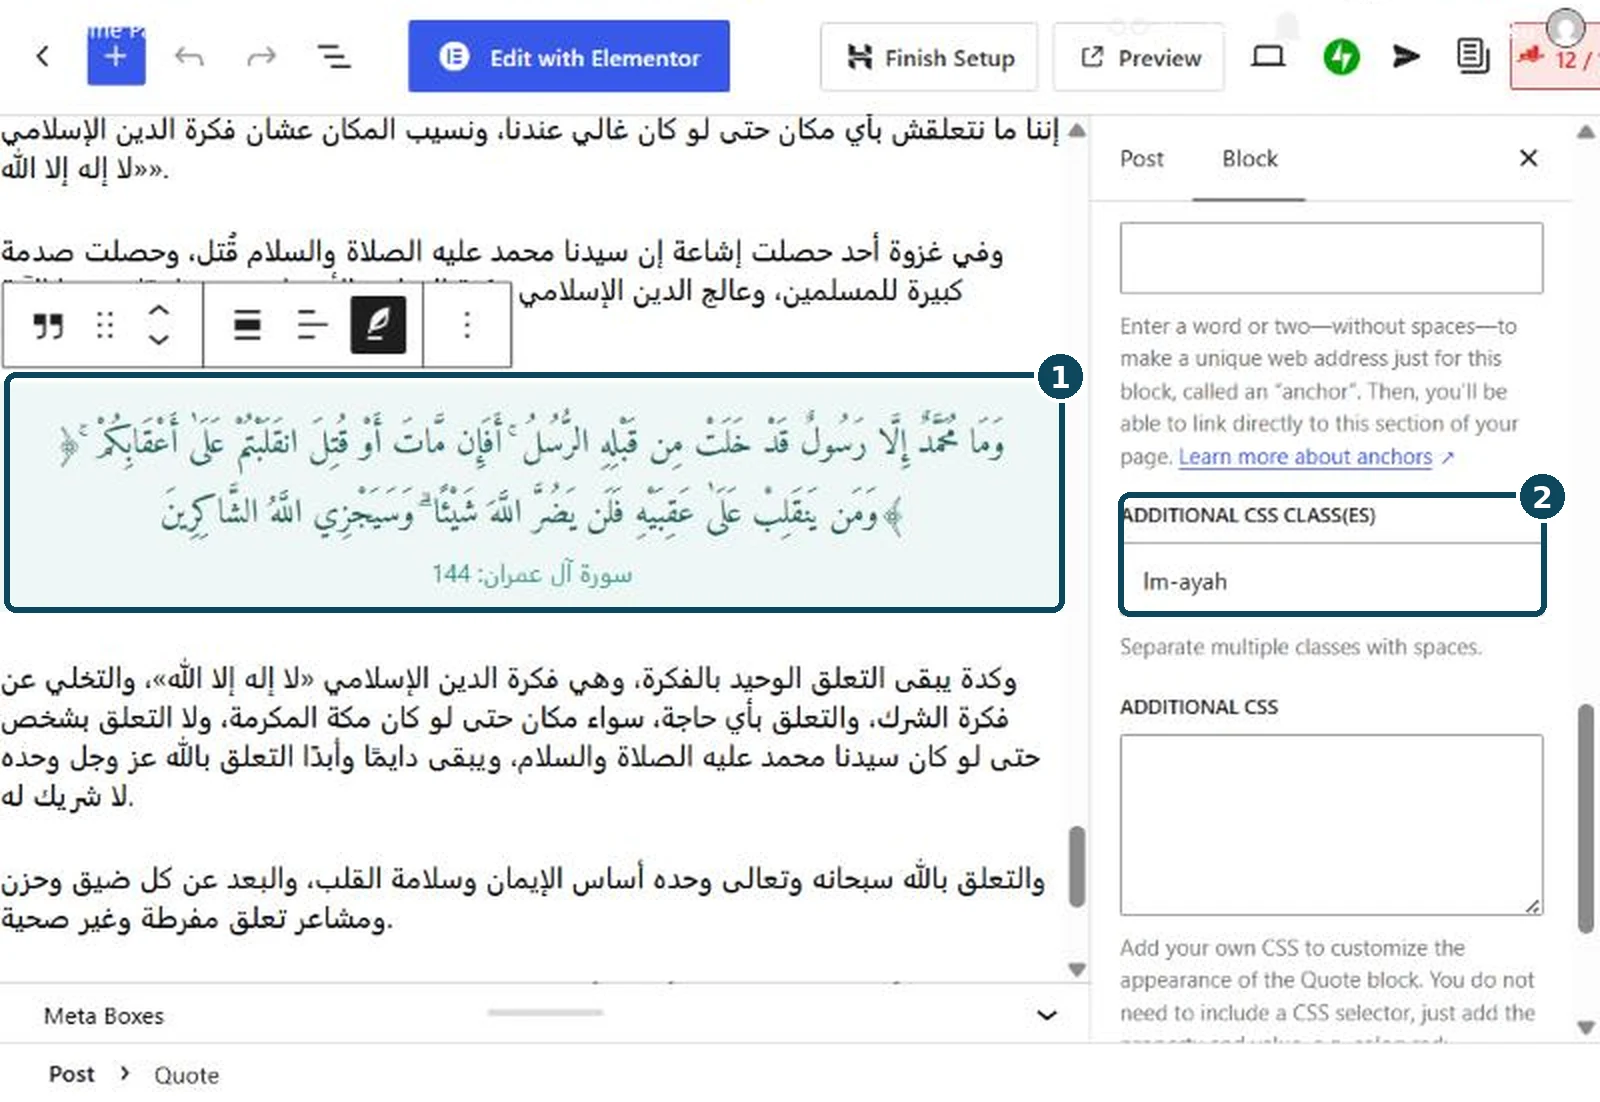
Select the whole quote, then go to Block → Advanced and paste lm-ayah
1 The quote block is selected. 2 The lm-ayah class in the box.
On the site, the verse is set in a calligraphic font with the surah name below it.
A hadith or dhikr
The steps are the same as for a verse, but the class is lm-hadith and the background is a soft sand color.
Other classes
Use
Block type
Class
A narration line (the story between dialogue) in a calm gray
Paragraph
lm-narr
A round of opinions (each friend speaks in her own box)
List
lm-round
The closing sentence at the end of a post (teal-green, bold)
Paragraph
lm-closing
A round of opinions
After you add lm-round to the whole list, click each bullet on its own and give it the character's class without lm-say, for example lm-noha. Each bullet then appears in a box in her color.
Before publishing, set the post's details in the side panel.
Open the Post tab
Click the Post tab in the side panel, next to the Block tab. All the post's settings are there.
Top of the Post tab.
The Categories section.
The Tags section.
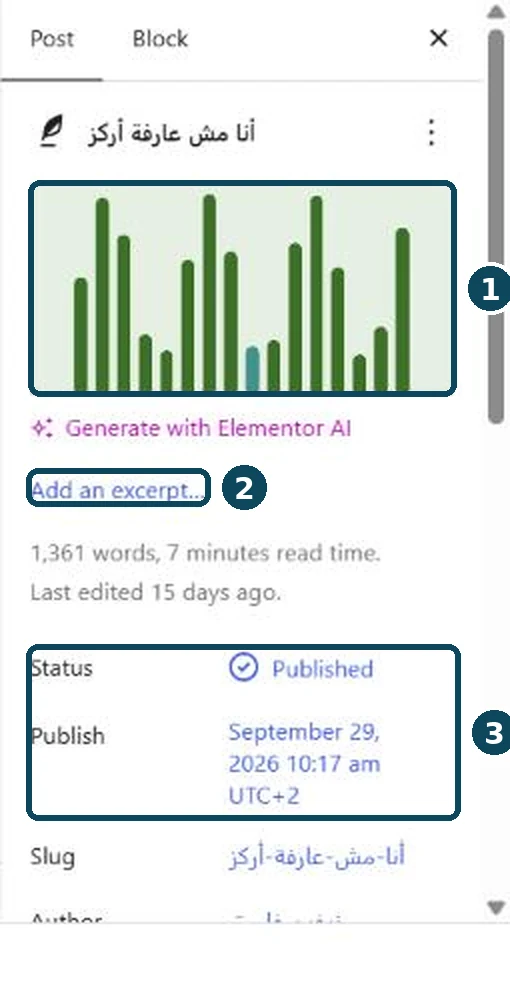
Featured image and excerpt
These are in the first screenshot above.
1 The featured image appears at the top of the post and on the post cards on the home page. Click Set featured image. Under Upload files, upload a picture from your computer, or pick one from the Media Library, then click Set featured image.
2Add an excerpt: two lines that sum up the post. They show under its title on the home page. If you leave it empty, the site uses the first words of the post.
3Status shows whether the post is published or a draft, and Publish is its publishing date.
No picture handy?
You can use the site's green wave image (pattern-equalizer) from the Media Library. It is the one on the current posts.
Category
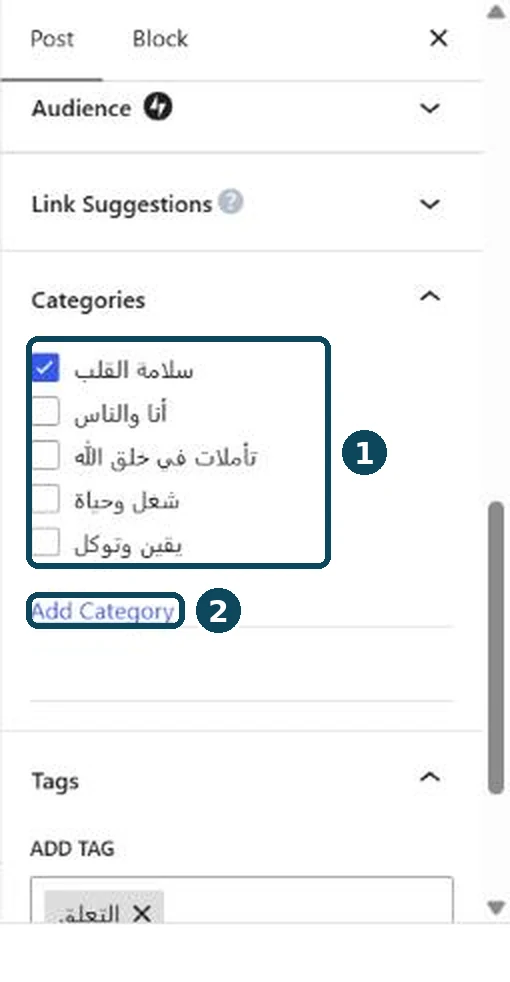
This is the second screenshot above.
1 Tick the category that fits. The current categories are أنا والناس (Me and People), تأملات في خلق الله (Reflections on Creation), سلامة القلب (Peace of Heart), شغل وحياة (Work and Life) and يقين وتوكل (Certainty and Trust).
2Add Category creates a new category right here. It is better to add it from the Categories page, where you can also set an English link and a description. See Categories and tags.
One category is enough
Choose a single category for each post, so readers find it where they expect.
Tags
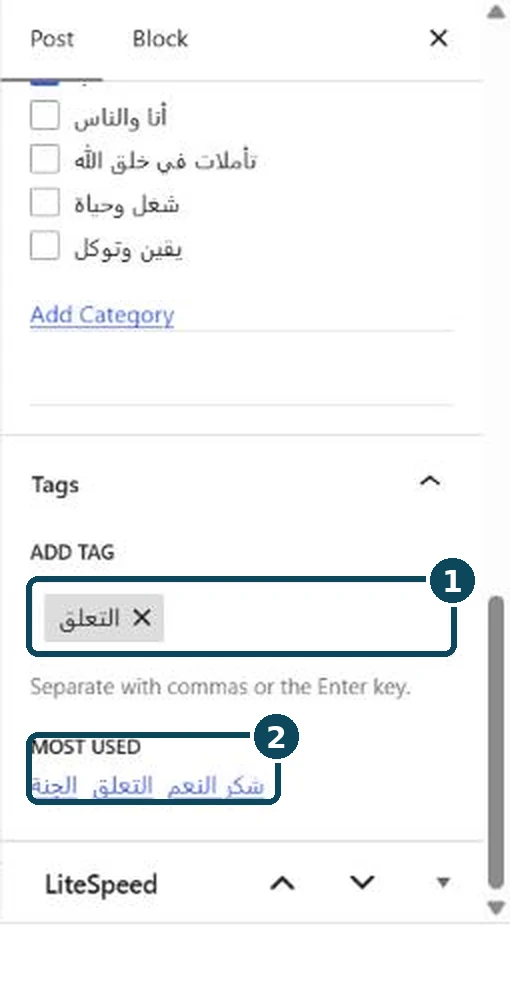
This is the third screenshot above.
1 In Add Tag, type a tag and press Enter or type a comma. Tags are the topics the post talks about, like "attachment" or "gratitude".
2Most used lists tags you have used before. Click one to add it. Start there before making a new tag, so the same topic isn't spread across different names.
The × next to a tag removes it from this post only. It stays on the site.
Check how the post looks, publish it now, or set a time for it to go live.
Preview before publishing
The Preview button at the top opens the post in a new tab, looking just like it will on the site. Use it to check colors and verses before anyone sees the post.
Publish now
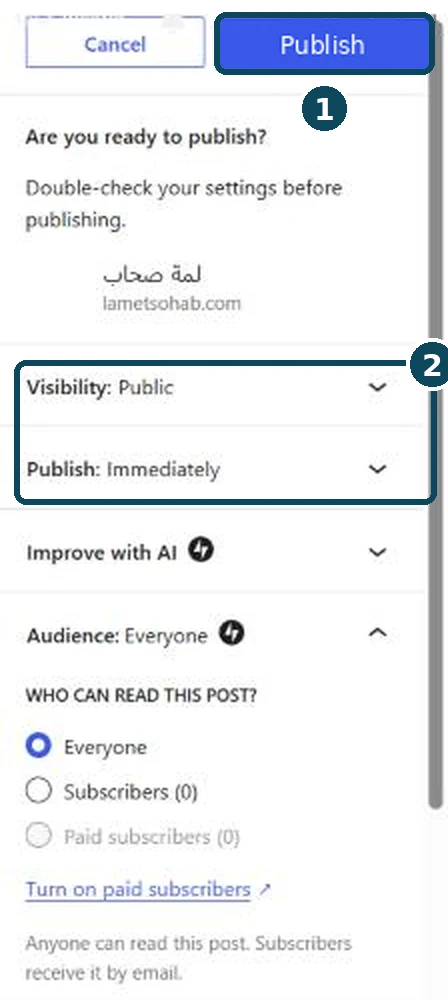
The "Are you ready to publish?" panel.
Click the blue Publish button at the top.
2 A last-check panel appears. The post will be visible to everyone (Public) and goes live now (Immediately).
1 Click Publish again in this panel to publish for real.
A message confirms the post is live, with a link to it.
Subscribers get an email
The same panel has a Newsletter section. If the site has subscribers, they will receive the post by email, so review it carefully before the second click.
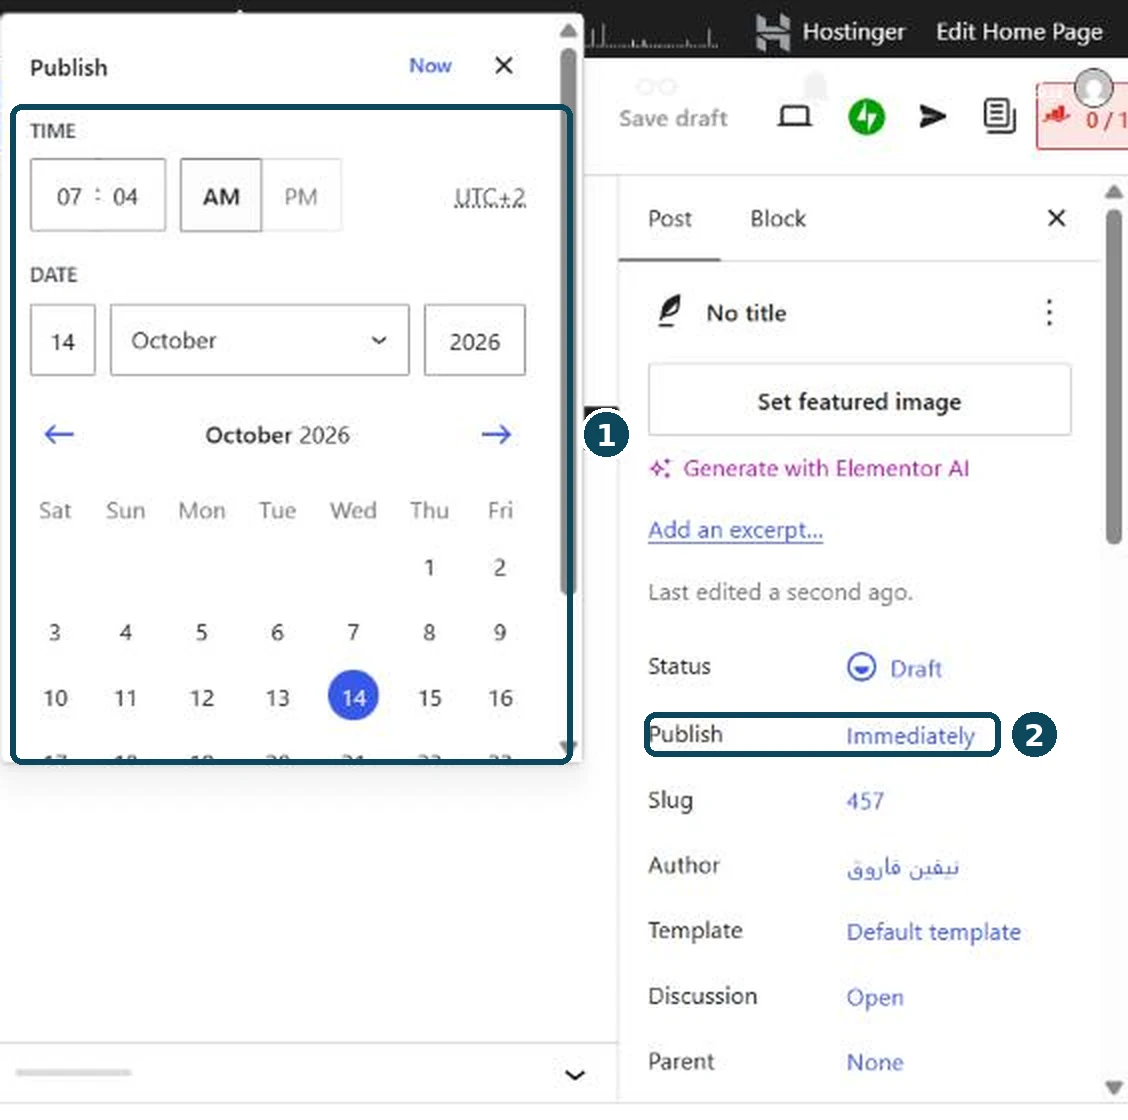
Schedule a post for later
2 Click Immediately next to Publish. 1 The calendar opens.
In the Post tab, click Immediately next to Publish.
Pick the day on the calendar, type the hour and minute, and choose AM or PM.
Close the calendar. The publish button now says Schedule. Click it, then click Schedule again to confirm.
The post waits in the list with the status Scheduled and goes live by itself.
Edit a published post
Open the post with Edit, make your changes, and click Save (or Update) at the top. The change shows on the site right away.
If you make a mistake
The site keeps older copies of every post. In the Post tab, open Revisions and click Restore This Revision to go back to an earlier version. While you are still typing, Ctrl + Z undoes your last step.
Categories are the big sections shown in the site's menu. Tags are small topics that connect posts. Both have a page in the dashboard, and the two pages look almost the same.
Categories
Go to Posts → Categories.
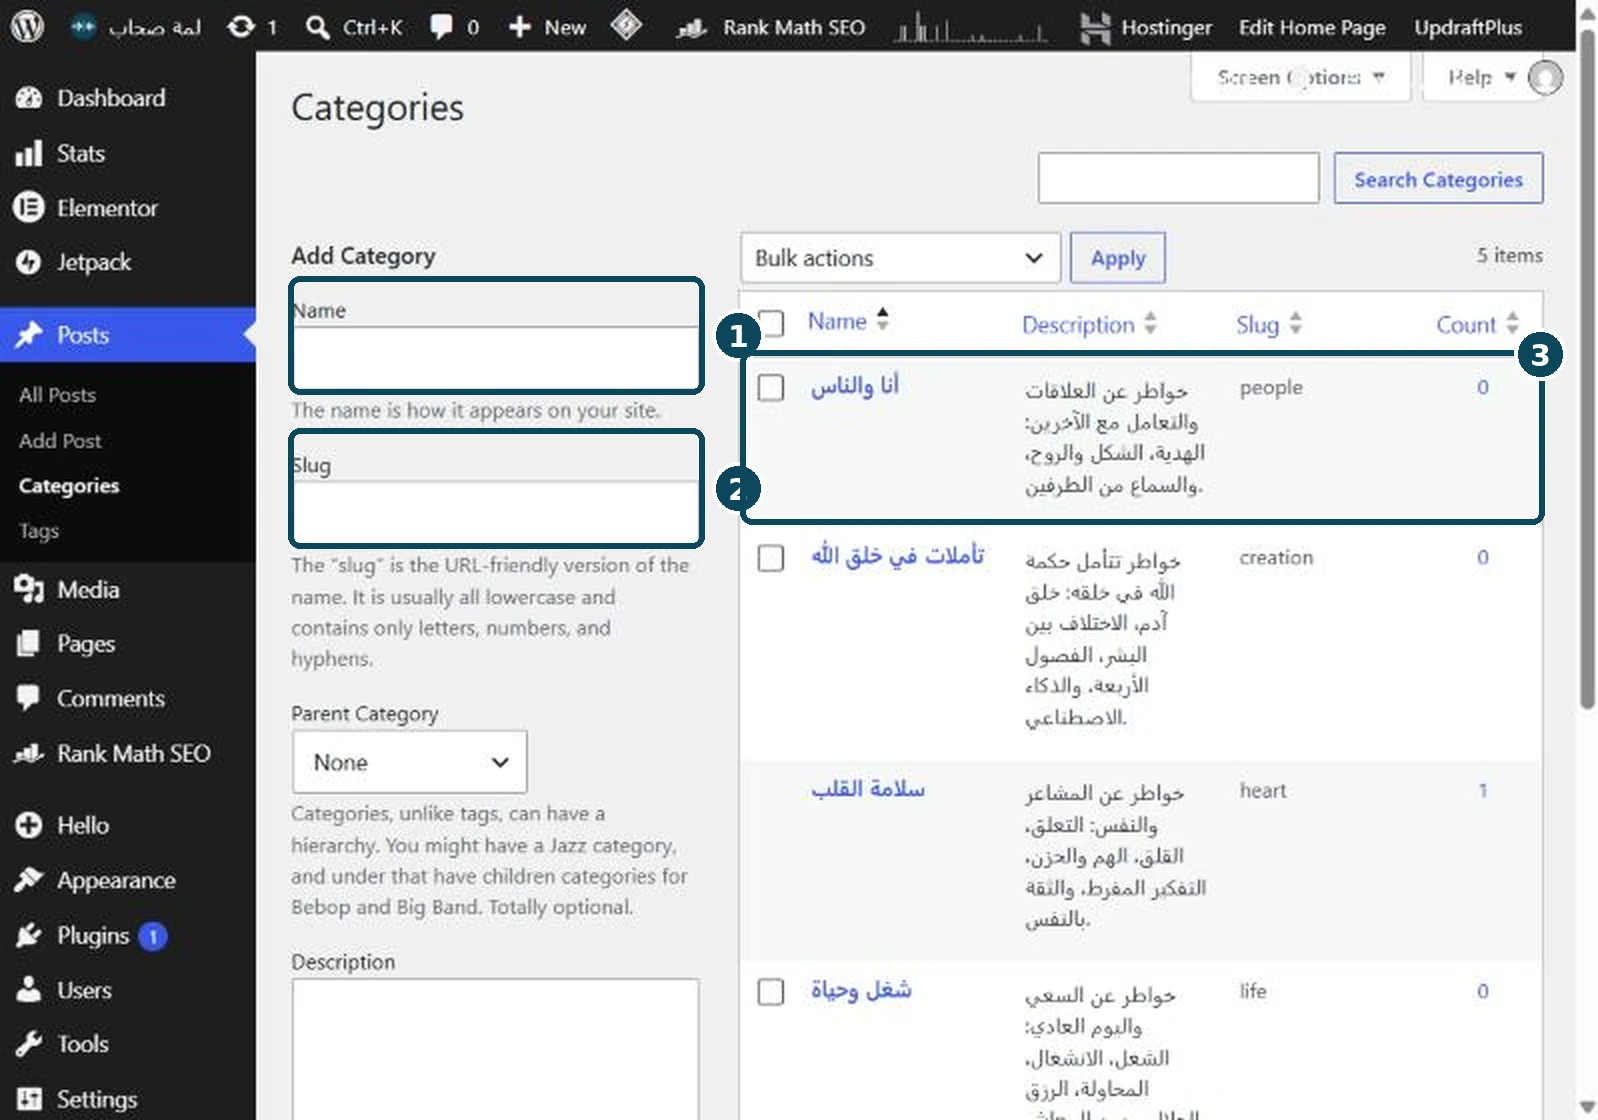
The categories page: the add form on the left, existing categories on the right.
1Name: the category name in Arabic, as readers will see it.
2Slug: a short English word used in the category's link, for example faith for يقين وتوكل. Use lowercase letters, and put - between words. Try not to change it after publishing, so old links keep working.
Write a Description (a short text shown on the category page), then click Add Category at the bottom.
3 To edit a category, click its name. The Count column shows how many published posts it has.
The default category, سلامة القلب
This is the site's default category, so it has no checkbox and can't be deleted. Any post published without a category goes into it automatically.
Tags
Go to Posts → Tags.
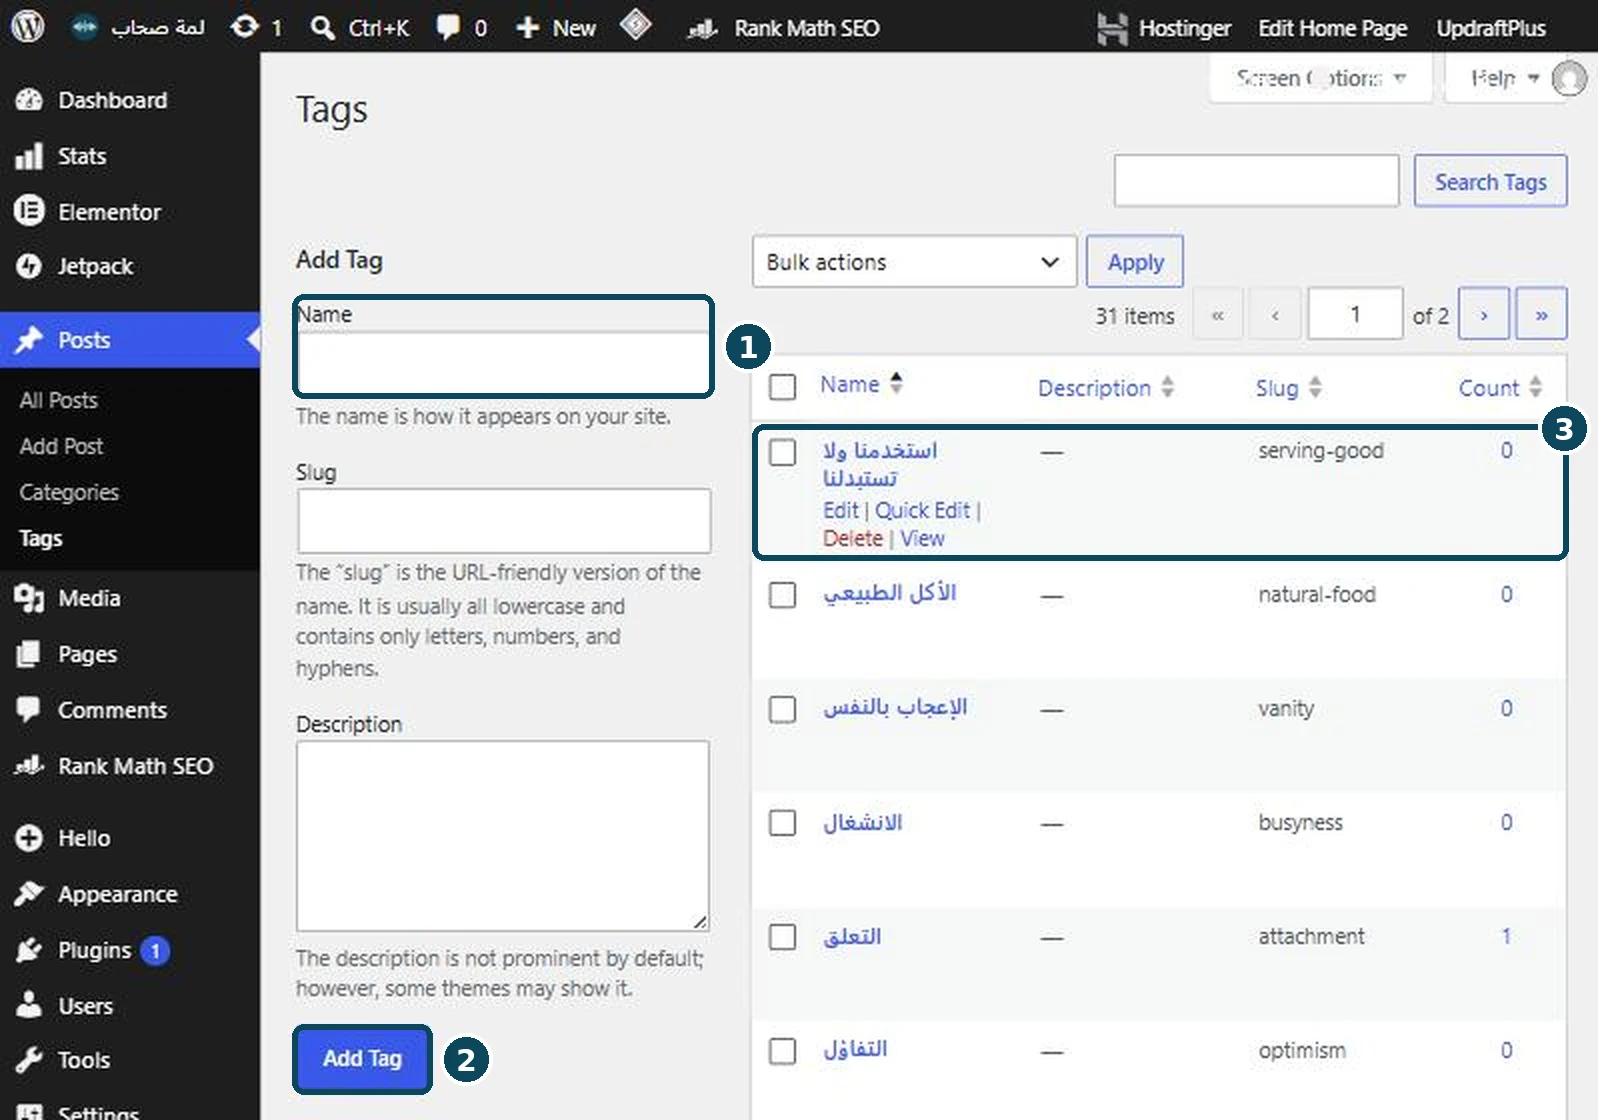
The tags page.
1 Type the tag in Name, and an English slug, just like categories.
2 Click Add Tag.
3 Move your mouse over a tag to see Edit, Quick Edit, Delete and View. Deleting a tag only removes it from the posts. The posts themselves stay.
About the counter
The numbers in the Count column count published posts only, so drafts are not included until they are published.
A page made for you to change the dialogue colors and add new characters.
Open the page
Go to Appearance → Speaker Colors.
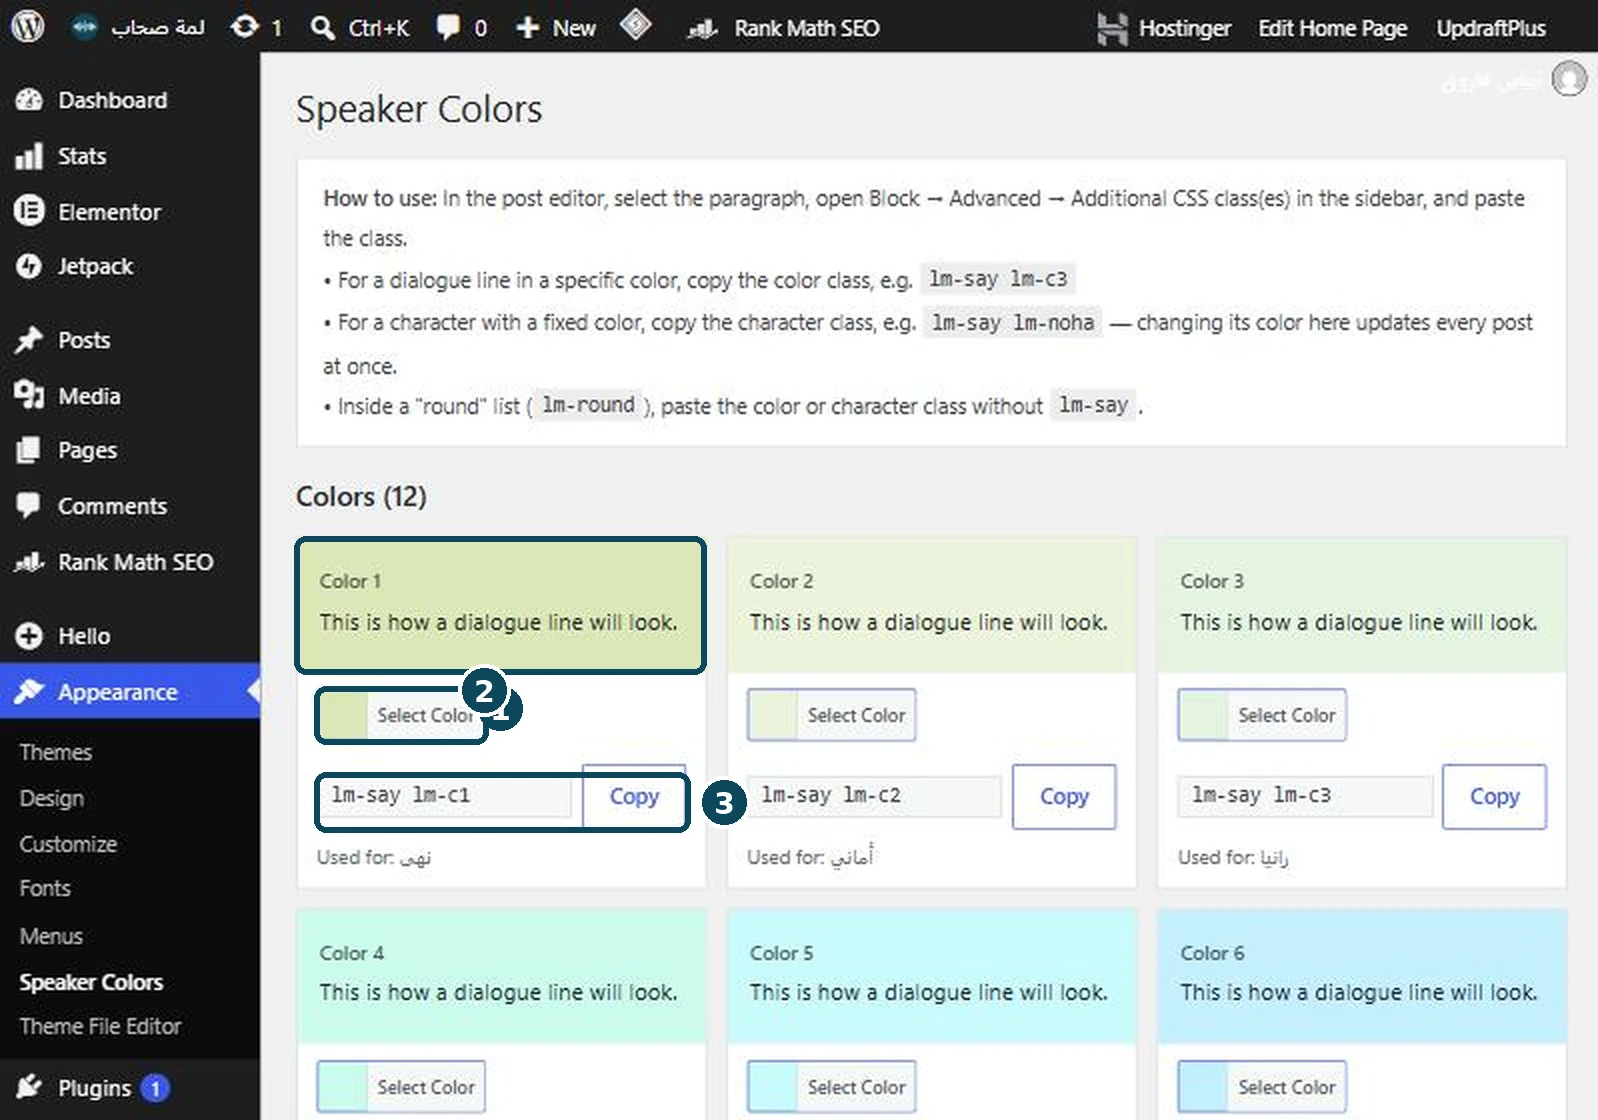
The Speaker Colors page: a short guide at the top, then the 12 color cards.
The 12 color cards
1 Each card shows a dialogue line in that color. Under it, Used for lists the characters that use the color.
2 To change the color, click Select Color.
3Copy copies the color's class, for example lm-say lm-c1. Use it when you want a line in a certain color that isn't tied to a character.
Pick a color
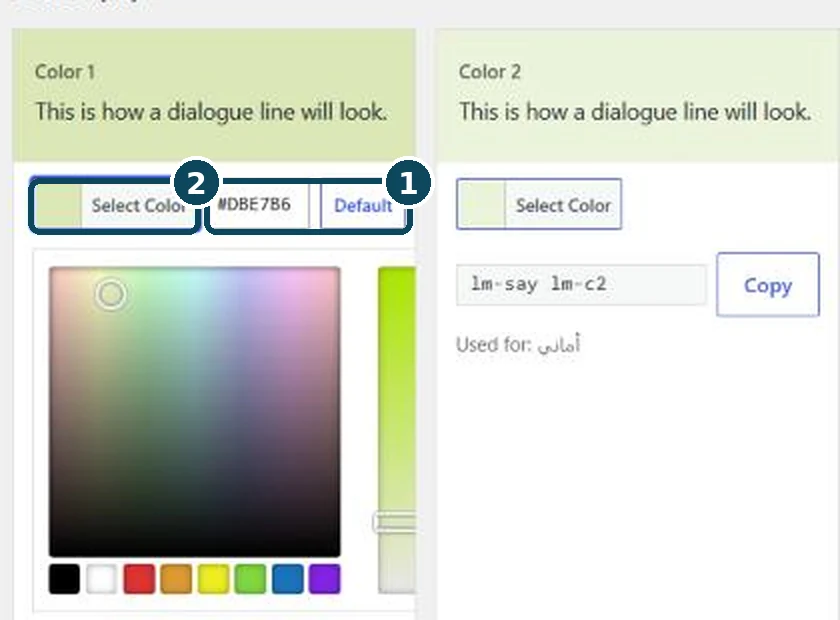
The color picker after clicking Select Color.
Drag the circle in the big square until you reach the color you want. The preview above it changes as you move.
1 Or type a color code straight into the box, for example #DBE7B6.
Default puts this card back to its original color.
2 Click Select Color again to close the picker.
Choose light colors
Text is dark on top of the background, so soft, light colors keep reading comfortable.
The characters table
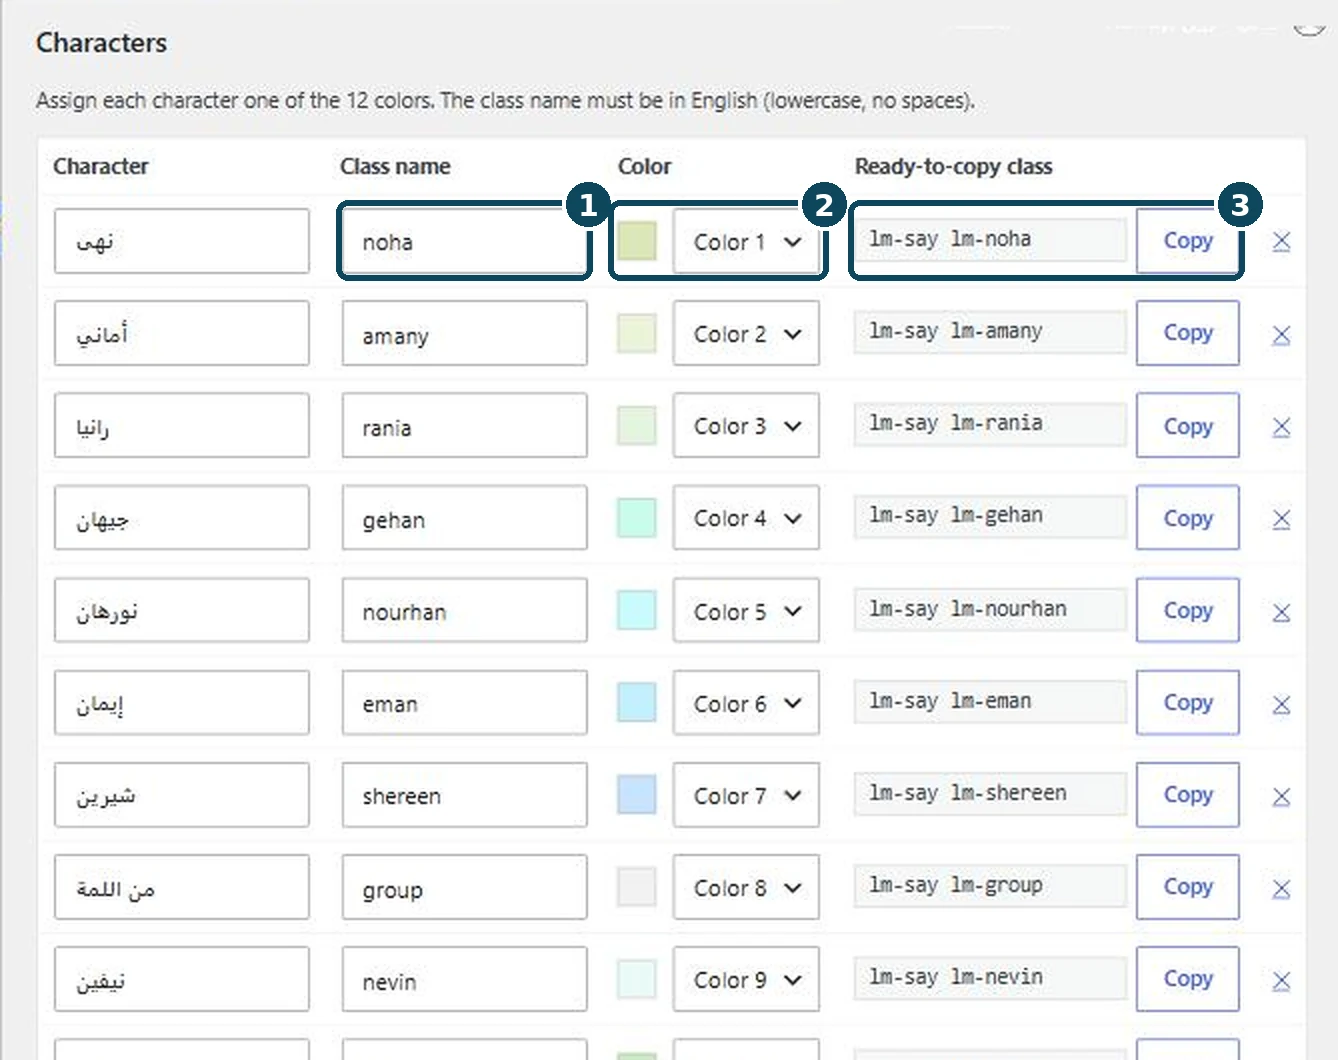
Each character is linked to a color number.
1Class name: the character's name in English, which forms her class. Don't change it for existing characters, because older posts are saved with it.
2Color: choose the color number for the character. If you change it here, the color changes in every old and new post at once.
3 The ready-to-copy class and its Copy button, so you can paste it straight into the editor.
Add a new character
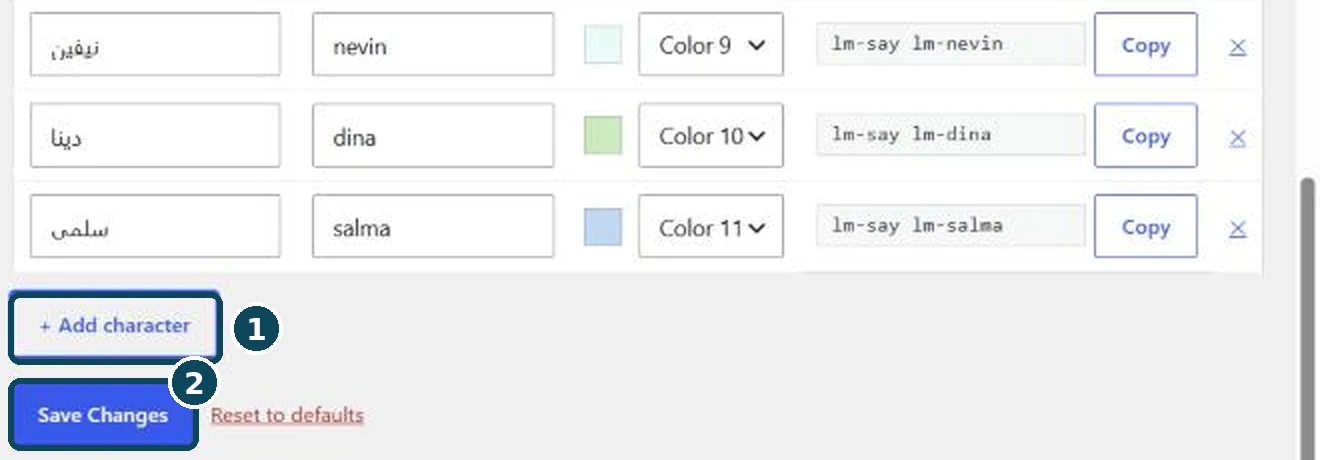
Example: adding "Salma" with color number 11.
1 Click + Add character. A new row appears at the end of the table.
Type her name in Arabic, then her name in English with no spaces (for example salma), and choose her color.
2 Click Save Changes. Nothing is saved until you do.
Her class is now lm-say lm-salma, ready to use.
Before you remove a character
The × removes the character from the table, and her lines in older posts go back to gray. Reset to defaults puts every color and character back as they were at the start, so use it with care.
Changes show right away
After Save Changes the site refreshes itself, so readers see the new colors immediately. If you still see the old ones, refresh the page.
A few small habits that save time and prevent mistakes.
Writing and saving
Save often. The site saves automatically every so often, but Save draft gives you peace of mind, especially in long posts.
Preview first. Use Preview before every publish, and look at the post on your phone too, because most readers read there.
Images. Upload clear pictures about 1200 pixels wide, and give the file a meaningful name before uploading.
When something looks odd
"There is an autosave…" message. It means an automatically saved copy is newer than your last save. Click View the autosave to compare and pick the right version.
The trash. A post in Trash stays for 30 days, then it is deleted for good.
Keep the site safe
Don't edit posts with Elementor, and don't change plugins or the site's general settings.
Your account. Don't share your password. If someone needs to write with you, we will make them their own account.
All the classes in one place. Click Copy, then paste it in Block → Advanced → Additional CSS class(es).
Happy writing! If you need anything, we are here. The Business Khana team.
كل ما تحتاجين إليه لكتابة خواطرك على lametsohab.com وتلوينها ونشرها، خطوةً بخطوة ودون أي خبرة تقنية.
أهلاً بكِ أستاذة نيفين. أُعدَّ هذا الدليل خصيصاً لكِ. ستتعلمين كيف تسجّلين الدخول، وتكتبين خاطرة جديدة، وتلوّنين سطور كل صديقة، ثم تنشرينها. على كل صورة أرقام، وشرح كل رقم موجود في الخطوات المجاورة لها.
اسم المستخدم: nevinfarouq، ويمكنكِ الدخول بالبريد الإلكتروني أيضاً.
لوحة التحكم باللغة الإنجليزية كبقية الموقع، لذلك نكتب أسماء الأزرار كما ستظهر أمامكِ تماماً، بهذا الشكل: Publish. ويمكنكِ تحويلها إلى العربية كما في صفحة جولة في لوحة التحكم.
كيف تقرئين الصور
تشير الدائرة الزرقاء المخضرّة مثل 1 إلى موضع في الصورة، ويتكرر الرقم نفسه في النص الذي يشرحه. أما الدائرة البرتقالية ! فتعني أمراً يستحق الانتباه.
تبحثين عن شيء؟
اضغطي Ctrl + K (أو ⌘ + K على جهاز ماك) للبحث في جميع صفحات الدليل.
افتحي لوحة التحكم من أي متصفح، ولن يستغرق الأمر أكثر من دقيقة.
تسجيل الدخول
افتحي المتصفح واكتبي العنوان lametsohab.com/wp-admin ثم اضغطي Enter.
في خانة Username or Email Address اكتبي اسم المستخدم nevinfarouq أو بريدك الإلكتروني.
اكتبي كلمة المرور. تُظهر أيقونة العين المجاورة للخانة ما كتبتِه لتتأكدي منه.
فعّلي الخيار Remember Me إن كان الجهاز شخصياً، فيتذكّركِ الموقع ولا تحتاجين إلى تسجيل الدخول في كل مرة.
اضغطي زر Log In الأخضر.
صفحة تسجيل الدخول.
هل نسيتِ كلمة المرور؟
يحدث هذا للجميع
اضغطي Lost your password? أسفل الخانات واكتبي بريدك الإلكتروني، وسيصلكِ رابط لإنشاء كلمة مرور جديدة.
أول شاشة تظهر لكِ بعد الدخول هي لوحة التحكم (Dashboard). وفيما يلي وظيفة كل جزء فيها.
القائمة الرئيسية
تضم القائمة الداكنة على اليسار جميع أقسام الموقع. ولوحة التحكم باللغة الإنجليزية كبقية الموقع، لذلك نكتب أسماء الأزرار كما ستظهر أمامكِ تماماً.
1 قسم Posts هو موطن الخواطر، ومنه يبدأ معظم عملكِ.
تحويل لوحة التحكم إلى العربية
إن فضّلتِ ذلك، يمكنكِ عرض لوحة التحكم كاملةً باللغة العربية. هذا الإعداد خاص بحسابكِ وحدكِ، ولا يغيّر لغة الموقع التي يراها القرّاء.
مرّري المؤشر فوق اسمكِ في أعلى الشاشة (Howdy, …) ثم اضغطي Edit Profile. ويمكنكِ أيضاً فتح Users ← Profile من القائمة.
انزلي إلى خانة Language واختاري منها العربية.
انزلي إلى أسفل الصفحة واضغطي Update Profile. ستتحول لوحة التحكم إلى العربية فوراً.
يمكنكِ الرجوع في أي وقت
اتبعي الخطوات نفسها واختاري English (United States). وإذا لم تجدي العربية في القائمة، فأخبرينا لنضيفها.
أسماء الأزرار في هذا الدليل
يكتب الدليل جميع الأزرار بالإنجليزية كما تظهر الآن في لوحة التحكم. وبعد التحويل إلى العربية ستظهر الأزرار بالعربية، فاستعيني بالصور وبمربع البحث للوصول إليها. وستظهر صفحة ألوان المتحدثين بالعربية أيضاً.
تُكتب الخواطر في هذا المحرر العادي فقط. فزر Elementor مخصص لتصميم صفحات الموقع، وقد يُفسد التنسيق والألوان إذا استُخدم مع خاطرة.
قائمة الكتل
قائمة الكتل بعد الضغط على +.
1 مربع البحث: اكتبي اسم الكتلة بدلاً من البحث عنها.
2Paragraph: فقرة عادية، وهي التي ستستخدمينها لجميع سطور الحوار والسرد.
3Heading: عنوان فرعي داخل الخاطرة.
4Quote: اقتباس، ونستخدمه للآيات والأحاديث.
5List: قائمة نقطية أو مرقّمة.
طريقة أسرع
في كتلة فارغة اكتبي / ثم اسم الكتلة، مثل /quote، واضغطي Enter.
لكل صديقة في «اللمة» لون خلفية ثابت، فيعرف القارئ من تتحدث دون أن نكتب اسمها.
شكل السطور على الموقع
يُطبَّق اللون على الفقرة عبر «فئة» (class)، وهي اسم قصير بالإنجليزية تلصقينه في خانة Additional CSS class(es).
دخلت صاحبتنا رانيا علينا ووشها متغير، وحسّينا إن عندها مشكلة.
مالك يا رانيا؟ إيه اللي حصلك من امبارح؟ كنتي كويسة بالليل؟!!!
الغاز ما اشتغلش النهاردة، ومعرفتش أشرب القهوة والشاي بلبن بتوعي.
إحنا افتكرنا عندك مصيبة، وقّعتي قلبنا! كل الحزن ده عشان القهوة والشاي بلبن؟ طيب ما تشربيهم معانا.
السطر الأول سرد عادي بلا لون، والثاني «من اللمة» (رمادي)، والثالث لرانيا، والرابع لنهى.
كيف تلوّنين سطراً
فقرة لرانيا محددة، وفئتها ظاهرة في اللوحة الجانبية.
اكتبي جملة الحوار في فقرة مستقلة.
2 اضغطي على الفقرة مرة واحدة لتحديدها.
إذا لم تظهر اللوحة الجانبية، فاضغطي أيقونة المربع في أعلى اليمين بجوار زر النشر.
1 في اللوحة الجانبية اختاري تبويب Block.
انزلي إلى أسفل اللوحة واضغطي Advanced لفتحه.
3 في خانة Additional CSS class(es) الصقي فئة الشخصية، مثل: lm-say lm-rania
اضغطي في أي مكان خارج الخانة، فيتغير لون الفقرة أمامكِ في المحرر فوراً.
فئات الشخصيات
تتكون كل فئة من كلمتين بينهما مسافة: lm-say ومعناها «سطر حوار»، والثانية اسم الشخصية. ويقوم الزر المجاور لكل فئة بنسخها.
يعرض الجدول الألوان الحالية. وإذا غيّرتِ لوناً أو أضفتِ شخصية من صفحة الألوان، فتلك الصفحة هي المرجع الأحدث.
اعملي بسرعة
تكرار سطر للشخصية نفسها
بعد تلوين أول سطر لنهى مثلاً، حدّديه واضغطي Ctrl + Shift + D (أو ⌘ + Shift + D على جهاز ماك). ستظهر تحته نسخة بالّلون نفسه لتكتبي فيها الجملة التالية. وتحتفظ الكتلة المنسوخة بلونها كذلك إذا لصقتِها في مكان آخر.
انتبهي للمسافة والحروف
ضعي مسافة واحدة فقط بين lm-say واسم الشخصية، واكتبي الحروف كلها إنجليزية صغيرة. وإذا حدّدتِ أكثر من كتلة معاً فلن يظهر قسم Advanced، لذا حدّدي فقرة واحدة فقط.
النتيجة على الموقع
خاطرة «أنا مش عارفة أركز» على الموقع، وكل صديقة بلونها.
إضافةً إلى سطور الحوار، توجد فئات أخرى تمنح الخاطرة مظهرها المميز. وتوضع جميعها بالطريقة نفسها في خانة Additional CSS class(es).
الآية القرآنية
أضيفي كتلة Quote (اكتبي /quote ثم اضغطي Enter).
اكتبي الآية داخل الاقتباس، وفي السطر الصغير أسفلها (Add citation) اكتبي اسم السورة ورقم الآية.
حدّدي الاقتباس كله، ثم من Block ← Advanced الصقي lm-ayah
1 كتلة الاقتباس محددة. 2 الفئة lm-ayah في الخانة.
تظهر الآية على الموقع بخط الأميري في المنتصف، واسم السورة أسفلها.
الحديث أو الذكر
الخطوات نفسها المتبعة مع الآية، لكن الفئة هي lm-hadith وخلفيتها بلون رملي فاتح.
فئات أخرى
الاستخدام
نوع الكتلة
الفئة
سطر سرد (الحكي بين سطور الحوار) بلون رمادي هادئ
Paragraph
lm-narr
جولة آراء (تبدي كل صديقة رأيها في مربع)
List
lm-round
جملة الختام في نهاية الخاطرة (بلون أخضر مزرقّ وخط عريض)
Paragraph
lm-closing
جولة الآراء
بعد إضافة lm-round إلى القائمة كلها، اضغطي على كل نقطة على حدة وأعطيها فئة الشخصية دون lm-say، مثل lm-noha. فتظهر كل نقطة في مربع بلون صاحبتها.
قبل النشر، حدّدي تفاصيل الخاطرة من اللوحة الجانبية.
افتحي تبويب Post
اضغطي تبويب Post في اللوحة الجانبية (بجوار تبويب Block)، وستجدين فيه إعدادات الخاطرة كلها.
أعلى تبويب Post.
قسم Categories.
قسم Tags.
الصورة البارزة والمقتطف
تجدينهما في الصورة الأولى أعلاه.
1 الصورة البارزة هي التي تظهر في أول الخاطرة وعلى بطاقات الخواطر في الصفحة الرئيسية. اضغطي Set featured image، ثم ارفعي صورة من جهازكِ عبر Upload files أو اختاري من Media Library، ثم اضغطي Set featured image.
2Add an excerpt: سطران يلخّصان الخاطرة ويظهران أسفل عنوانها في الصفحة الرئيسية. وإذا تركتِه فارغاً أخذ الموقع الكلمات الأولى من الخاطرة.
3 يوضّح Status إن كانت الخاطرة منشورة أم مسودة، ويحدّد Publish تاريخ النشر.
إن لم تتوفر صورة
يمكنكِ استخدام صورة الموجات الخضراء الخاصة بالموقع (pattern-equalizer) من Media Library، وهي المستخدمة في الخواطر الحالية.
التصنيف
هذه هي الصورة الثانية أعلاه.
1 اختاري التصنيف المناسب للخاطرة. التصنيفات الحالية: أنا والناس، تأملات في خلق الله، سلامة القلب، شغل وحياة، يقين وتوكل.
2 يضيف Add Category تصنيفاً جديداً من هنا مباشرة. لكن الأفضل إضافته من صفحة التصنيفات لتتمكني من كتابة رابط إنجليزي ووصف. وشرحها في صفحة التصنيفات والوسوم.
يكفي تصنيف واحد
يُفضَّل اختيار تصنيف واحد لكل خاطرة، ليجدها القارئ في المكان المتوقع.
الوسوم
هذه هي الصورة الثالثة أعلاه.
1 في خانة Add Tag اكتبي الوسم ثم اضغطي Enter أو ضعي فاصلة (,). الوسوم هي المواضيع التي تتناولها الخاطرة، مثل «التعلّق» أو «شكر النعم».
2Most used: الوسوم التي استخدمتِها سابقاً. اضغطي أي وسم لإضافته فوراً. وابدئي بها قبل إنشاء وسم جديد، حتى لا يتكرر الموضوع نفسه بأسماء مختلفة.
تزيل علامة × المجاورة للوسم هذا الوسم من الخاطرة الحالية فقط، ولا تحذفه من الموقع.
راجعي شكل الخاطرة، ثم انشريها الآن، أو حدّدي موعداً لنشرها تلقائياً.
المعاينة قبل النشر
يفتح زر Preview في الأعلى الخاطرة في تبويب جديد بالشكل نفسه الذي ستظهر به على الموقع، لتراجعي الألوان والآيات قبل أن يراها أحد.
1 اضغطي Publish مرة أخرى في هذه اللوحة ليتم النشر فعلاً.
ستظهر رسالة تفيد بنشر الخاطرة ومعها رابطها.
يصل المشتركين بريد إلكتروني
في اللوحة نفسها قسم Newsletter. فإذا كان للموقع مشتركون، وصلهم بريد إلكتروني بالخاطرة، لذا راجعيها جيداً قبل الضغطة الثانية.
جدولة الخاطرة لوقت لاحق
2 اضغطي كلمة Immediately بجوار Publish. 1 سيُفتح التقويم.
من تبويب Post اضغطي Immediately المجاورة لـ Publish.
اختاري اليوم من التقويم، واكتبي الساعة والدقيقة، ثم اختاري AM (صباحاً) أو PM (مساءً).
أغلقي التقويم، وسيتحول اسم زر النشر إلى Schedule. اضغطيه، ثم اضغطي Schedule مرة أخرى للتأكيد.
تنتظر الخاطرة في القائمة بحالة Scheduled، وتُنشر تلقائياً في موعدها.
تعديل خاطرة منشورة
افتحي الخاطرة بـ Edit، وعدّلي ما تريدين، ثم اضغطي Save (أو Update) في الأعلى. يظهر التعديل على الموقع فوراً.
إذا وقع خطأ في التعديل
يحتفظ الموقع بنسخ قديمة من كل خاطرة. في تبويب Post ستجدين Revisions، ومنها يمكنكِ الرجوع إلى أي نسخة سابقة بزر Restore This Revision. كما يتراجع Ctrl + Z عن آخر خطوة ما دمتِ تكتبين.
التصنيفات هي الأقسام الكبيرة التي تظهر في قائمة الموقع، والوسوم مواضيع صغيرة تربط الخواطر ببعضها. ولكل منهما صفحة في لوحة التحكم، والصفحتان متشابهتان تقريباً.
التصنيفات
اذهبي إلى Posts ← Categories.
صفحة التصنيفات: نموذج الإضافة على اليسار، والتصنيفات الموجودة على اليمين.
1Name: اسم التصنيف بالعربية كما سيظهر للقارئ.
2Slug: كلمة إنجليزية قصيرة تظهر في رابط التصنيف، مثل faith لتصنيف «يقين وتوكل». استخدمي حروفاً صغيرة، وإذا كان الاسم أكثر من كلمة فضعي - بينها. ويُفضَّل ألا تغيّريه بعد النشر حتى لا تتعطل الروابط القديمة.
اكتبي Description (وصفاً قصيراً يظهر في صفحة التصنيف)، ثم اضغطي Add Category في الأسفل.
3 لتعديل تصنيف موجود، اضغطي على اسمه. ويوضّح عمود Count عدد الخواطر المنشورة فيه.
التصنيف الأساسي «سلامة القلب»
هذا هو التصنيف الافتراضي للموقع، لذلك لا يحتوي على مربع اختيار ولا يمكن حذفه. وأي خاطرة تُنشر دون تصنيف تُضاف إليه تلقائياً.
الوسوم
اذهبي إلى Posts ← Tags.
صفحة الوسوم.
1 اكتبي اسم الوسم في Name، واكتبي الـ Slug بالإنجليزية كما في التصنيفات.
2 اضغطي Add Tag.
3 عند تمرير المؤشر فوق أي وسم تظهر تحته الخيارات Edit وQuick Edit وDelete وView. وحذف الوسم يزيله من الخواطر فقط، أما الخواطر نفسها فلا تُحذف.
ملاحظة عن العدّاد
تحسب الأرقام في عمود Count الخواطر المنشورة فقط، فلا تدخل المسودات فيها حتى تُنشر.
أعددنا لكِ صفحة خاصة تغيّرين منها ألوان الحوار وتضيفين شخصيات جديدة.
افتحي الصفحة
اذهبي إلى Appearance ← Speaker Colors.
صفحة Speaker Colors: شرح سريع في الأعلى، وتحته 12 بطاقة للألوان.
بطاقات الألوان (12 لوناً)
1 تعرض كل بطاقة سطر حوار بذلك اللون، وتحته الشخصيات التي تستخدمه (Used for).
2 لتغيير اللون اضغطي Select Color.
3 ينسخ زر Copy فئة اللون، مثل lm-say lm-c1. استخدميه عندما تريدين سطراً بلون معيّن غير مرتبط بشخصية.
اختيار اللون
أداة اختيار اللون بعد الضغط على Select Color.
حرّكي الدائرة في المربع الكبير حتى تصلي إلى اللون المطلوب. وتتغير المعاينة في الأعلى أمامكِ.
1 أو اكتبي رمز اللون مباشرة في الخانة، مثل #DBE7B6.
يعيد زر Default اللون الأصلي لهذه البطاقة فقط.
2 اضغطي Select Color مرة أخرى لإغلاق الأداة.
اختاري ألواناً فاتحة
يُكتب النص بلون داكن فوق الخلفية، لذا تجعل الألوان الفاتحة الهادئة القراءة مريحة.
جدول الشخصيات
كل شخصية مرتبطة برقم لون.
1Class name: اسم الشخصية بالإنجليزية، وهو ما تتكوّن منه الفئة. لا تغيّريه للشخصيات الموجودة، لأن الخواطر القديمة محفوظة به.
2Color: اختاري رقم لون الشخصية. وإذا غيّرتِه هنا تغيّر اللون في جميع الخواطر القديمة والجديدة دفعة واحدة.
1 اضغطي + Add character، فيظهر صف جديد في آخر الجدول.
اكتبي اسمها بالعربية، ثم اسمها بالإنجليزية دون مسافات (مثل salma)، واختاري لونها.
2 اضغطي Save Changes. ولا يُحفظ أي تغيير قبل هذه الضغطة.
تصبح فئتها lm-say lm-salma وجاهزة للاستخدام.
قبل حذف شخصية
تزيل علامة × الشخصية من الجدول، فتعود سطورها في الخواطر القديمة رمادية. أما Reset to defaults فيعيد جميع الألوان والشخصيات كما كانت في البداية، لذا استخدميه بحذر.
تظهر التغييرات فوراً
بعد Save Changes يحدّث الموقع نفسه تلقائياً، فيرى القرّاء الألوان الجديدة فوراً. وإذا ظهرت الألوان القديمة، فأعيدي تحميل الصفحة (Refresh).
عادات صغيرة توفّر الوقت وتمنع الأخطاء.
الكتابة والحفظ
احفظي كثيراً: يحفظ الموقع تلقائياً من وقت لآخر، لكن الضغط على Save draft أدعى للاطمئنان، خاصةً في الخواطر الطويلة.
راجعي بالمعاينة: استخدمي Preview قبل كل نشر، وانظري إلى الخاطرة على هاتفكِ أيضاً، لأن أغلب القرّاء يقرؤون منه.
الصور: ارفعي صوراً واضحة بعرض 1200 بكسل تقريباً، وسمّي الملف باسم معبّر قبل رفعه.
عند ظهور شيء غير معتاد
رسالة «There is an autosave…»: تعني وجود نسخة محفوظة تلقائياً أحدث من آخر حفظ. اضغطي View the autosave لتقارني بين النسختين وتختاري الصحيحة.
سلة المهملات: تبقى الخاطرة في Trash مدة 30 يوماً ثم تُحذف نهائياً.
حافظي على أمان الموقع
لا تعدّلي الخواطر بـ Elementor، ولا تغيّري الإضافات أو الإعدادات العامة للموقع.
حسابكِ: لا تشاركي كلمة المرور مع أحد، وإذا احتاج شخص إلى الكتابة معكِ فسننشئ له حساباً خاصاً به.
جميع الفئات في مكان واحد. اضغطي «نسخ» ثم الصقيها في Block ← Advanced ← Additional CSS class(es).
 Lamet Sohab docs